MasterpieceVR (Masterpiece Studio)

MasterpieceVR (MPVR) is a 3D sculpting and painting tool that allows users to build tangible objects, colourful environments, and high quality models. It also allows users to sculpt with friends in the same room in real time, or invite spectators to watch while the user creates.

MPVR was seeking a solution to meet the needs of a simple and easy-to-use annotation system that utilized cutting-edge industry tools. Working with MasterpieceVR involved designing and developing an aesthetically-pleasing and highly functional way for users to annotate their internal and external 3D creations.

I joined MPVR as a new interaction design grad and worked with a team of 2 UX designers and 3 game developers. At this time, MPVR was a fresh startup. I led the UX and UI across every aspect of our annotation project was responsible for ensuring our we stayed on track with our timeline and met all of our technical and usability requirements.

My key contributions to MPVR:

  • Curiosity and willingness to learn. An open mind allowed me to thrive in this cutting-edge tech environment.
  • Implemented a design process. This was key in helping our team establish more structure to how we conducted our work.
  • Ran a daily scrum meeting. As a brand new team of grads, we were lacking structure. I began running daily scrum meetings where we could each say cover status and blocks.

Understanding the Problem

Being a new and niche tool, MPVR was working quickly as a startup to set itself apart from competitors. To open themselves up to a bigger market, they needed a tool that could be utilized by professors and students. Providing this annotation tool would enable professors and students to take and leave notes while in a virtual space.

My research encompassed:

  • Understanding what UX looks like in a virtual space
  • Discovering what current typing methods were available in VR
  • Learning what annotation methods were already available

Developing a Process

We had a three month window to deliver our solution. To effectively kick off our project, we ran five day design sprint following Jake Knapp's process in The Sprint Book. Using this sprint method we could accelerate our approach towards innovating and solving our problem.
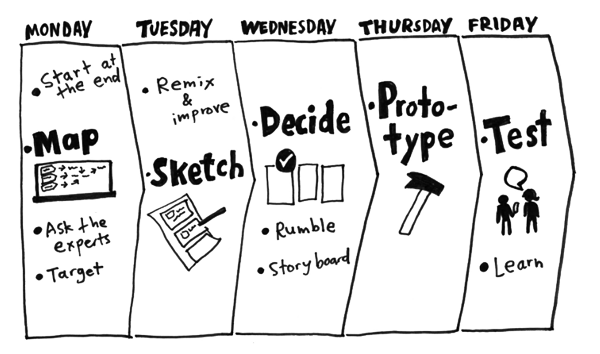
Day 1: Map

By mapping the user journey, we could better understand how many potential steps the user would need to take. By analyzing all the possible solutions, we could also see steps in the process that could be condensed or removed all together, simplifying the journey.

Day 2: Sketch

Next, we sketched various solutions, revealing consistent themes in our mapped user journey and unique approaches to the problem. While some team members shared similar ideas, each presented a distinct conceptual sketch.

Day 3: Decision

We voted using colored dot stickers to highlight elements in each map and sketch that we believed would drive the best solution. Following a thorough review by the CEO and project lead, a map and sketch were selected as our focus for the remainder of the timeline.
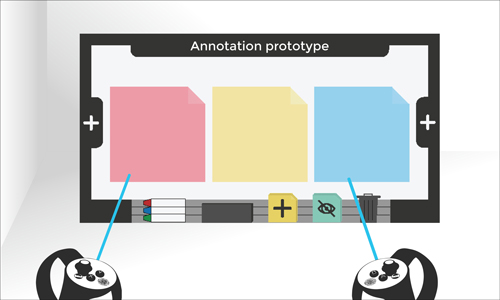
Day 4: Prototype

We collaborated closely with game developers to craft a rapid prototype. I tested it in virtual reality during development to ensure alignment with the selected map. The prototype featured basic visuals like blocks, spheres, and cones at this stage.

Day 5: Test

On the fifth day, we conducted user testing with a diverse group of students and professors, including both VR-experienced and inexperienced individuals. Valuable feedback from these tests informed the subsequent adjustments to our user journey mapping and interface design.

Meeting Objectives

Running our sprint revealed key targets that our design solution needed to meet:

  • Invest the majority of our time collecting feedback from user testing and using that feedback to inform re-designing for the best possible user experience
  • Conduct extensive research on cutting edge annotation tools on the VR market
  • Structure interface design and user flow to facilitate the user’s behaviour
  • Ensure ease of use for all users independent of their level of virtual technology understanding
  • Provide a clear method of interface navigation
  • Add user engagement tools
  • Plan for additional future digital initiatives

Achieving a Final Prototype

After extensive user testing and feedback integration, we reached a final prototype stage. I mocked up a 2D visual for what would be our final prototype:

Results and Takeaways

We presented our final working prototype and ran a live demo to students and professors. We had a lot of great feedback and carried this forward with a final project report.

  • Using a design sprint is powerful. Kicking off our project with this method helped our team focus on the problem and innovate to solve it.
  • Scrum goes a long way. Our team struggled with communication and working cohesively. Introducing a daily 15 minute scrum meeting made a world of difference.
  • Testing doesn't end after development. Design is a constant iteration of improving the experience for the end user. Always find ways to collect and listen to your user feedback.

Whiteboard artwork I created to support the brand and visual display of our live demo.

Magazines. Design. Process.

Coyle Media Group

Branding. Logo Design. Local.

Freelance